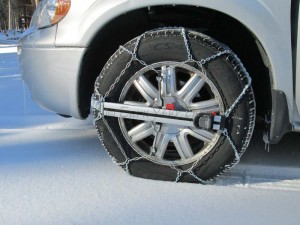
There are alternatives. Get a pair of more expensive chains. In the world of chains you do get what you pay for and the pricier ones are better for how easily they go on and off. Economically they’re expensive, but less so than 60 payments on a new vehicle with all- or four-wheel drive transmission. What I don’t know is the longevity of these chains, but my pair of Thule Easy-Fit chains are still working fine after three full seasons and a dozen days of use. I call ’em 1-minute chains.
While at Backcountry Magazine’s annual Gear Test my underpowered, front wheel drive minivan was tasked with driving up Powder Mountains 16% grade access road five days in a row. The road is brutal on transmissions, especially the passenger type. My own tranny has shared the stench of burnt oil to let me know it would not suffer many more sprints like that before croaking. Suffice it to say, if you lose traction, especially going down this road you will end up in the rocky creek that carved the canyon you’re driving in.
The second day of the week, Powder Mountain received a foot. Along the climb the snow transitioned from slush to light pow. Halfway up it was clear chains were needed. Door to door my transition time was probably four minutes, two-and-a-half to put the chains on both wheels, and a minute and a half taking ’em out of the car and putting their case back.
When you know what you’re doing, you can take ’em off pretty quick, but not as fast as on. To make releasing the tension of the wire that holds the chains snug on the tire, it is best to have the gap in the wire hoop at the top of the tire. This means positioning the tire with the wide band of chain at the bottom of the tire. Then, after you release the tension, reach in behind and grab one side of the hoop and pull it up. This will pull the wire out and create the slack needed to lift the hoop on both sides, separately, forward and over the tire, releasing the chain off the tire.
Maintenance
Compared to cheap chains, Thule’s chains look a bit under engineered. The gauge steep the chain links are built from is decidedly smaller than the clunking things that require constant practice to install quickly and correctly. They might last forever, but after one installation experience with these and you’ll gladly sign up for 60 months of exhorbitant payments to avoid that scene ever again.
Thule chains don’t look as durable, but since they are so easy to take on and off, I only keep them on as long as the road is snowy and slick. Secondly, I take the time to hose off grime and dirt that can clog the channels the braided cable runs through so it moves easily when I need it. Last summer I oiled the chain links to counter the effects of salt on the roads that will work overtime to rot the links with rust.
Bottom Line
While I’d much rather have an all-wheel drive vehicle, with Thule’s one-minute chains, even if they take five minutes total time to put on or take off, that’s a far cry better than cheap chains and a whole lot cheaper than a new Subaru, though admittedly not as sexy.
* – (Ed. Note: Apparently Thule sold off their chain business to Konig in Italy. No response after 24 hrs and their website shows availability limited to Northern Europe and Italy. C’est la vie)
© 2016


Recent Comments